13 Cute Easter Desserts That’ll Wow Your Guests is your ultimate guide to bringing extra sweetness and charm to your spring celebration. Easter is more than just egg hunts and colorful baskets—it’s a time to gather with loved ones, share laughter, and indulge in delightful treats that not only taste amazing but look absolutely adorable on the table. Whether you’re hosting a brunch, planning a family get-together, or simply want to surprise the kids with something festive, these dessert ideas are sure to add joy to your Easter spread.

From pastel-colored cupcakes and bunny-shaped cookies to creative no-bake treats and bite-sized goodies, each dessert on this list has been chosen for its crowd-pleasing appeal and visual charm. Think fluffy marshmallow chicks, chocolate nests, and fruity spring-inspired bars that capture the spirit of the season. These recipes are easy to follow, fun to make with kids, and perfect for both beginner bakers and those looking to add a whimsical touch to their dessert table.
Get ready to discover sweets that are almost too cute to eat—desserts that will leave your guests smiling, snapping pictures, and asking for seconds. As you scroll through this list, you’ll find inspiration to turn ordinary ingredients into show-stopping creations that feel right at home in any Easter celebration. Whether you’re drawn to light and fruity flavors or rich chocolatey bites, there’s something here to brighten your holiday and impress your guests.
So grab your apron, preheat the oven (or get the fridge ready for no-bake fun), and let’s dive into 13 irresistibly cute Easter desserts that are as delightful to look at as they are to devour.
Pastel Marshmallow Rice Krispie Treats
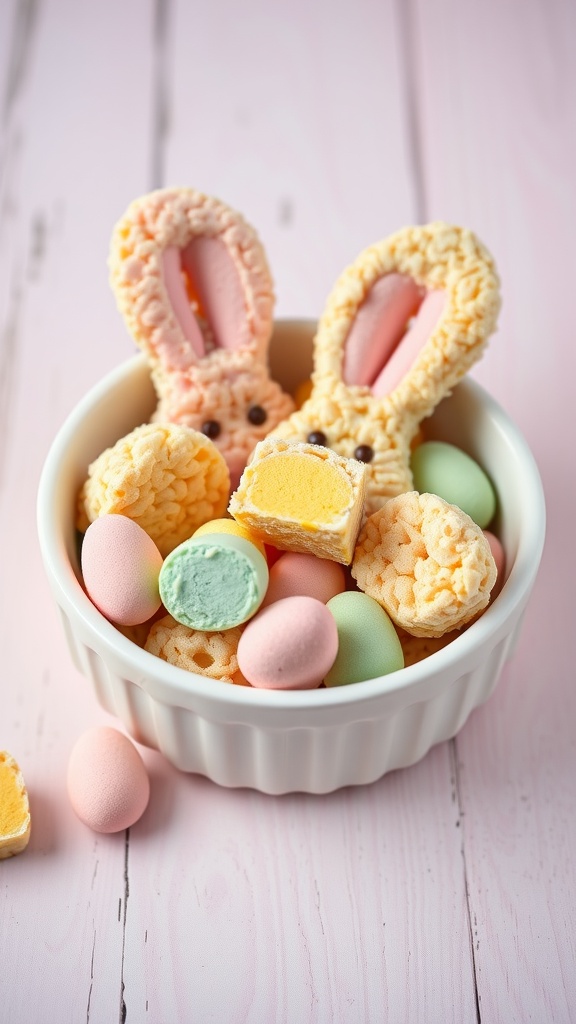
Pastel Marshmallow Rice Krispie Treats are delightful bites that combine the classic texture of Rice Krispie treats with a fun, festive twist. They offer a light, sweet flavor profile that’s perfect for spring celebrations. These treats are not just tasty but also visually appealing, making them a hit for any Easter gathering.
This recipe is straightforward and perfect for cooks of all skill levels. With just a few simple ingredients, you can whip up a batch in no time, making it a fun activity to do with kids or friends. Let’s dive into how to make these colorful, crispy treats!
Ingredients
- 6 cups Rice Krispies cereal
- 1/4 cup unsalted butter
- 1 package (10 oz) mini marshmallows
- 1 teaspoon vanilla extract
- Food coloring (pastel shades)
- Sprinkles (optional)
Instructions
- Melt the Butter: In a large pot, melt the butter over low heat. Once melted, add the mini marshmallows and stir until they are completely melted and smooth.
- Add the Vanilla: Remove the pot from heat and stir in the vanilla extract. If you want to add food coloring, separate the melted mixture into bowls and mix in your desired pastel shades.
- Mix in Rice Krispies: Quickly add the Rice Krispies cereal to the melted marshmallow mixture, stirring until all the cereal is well coated.
- Shape the Treats: Transfer the mixture into a greased baking dish. Press down firmly into an even layer. You can also use cookie cutters to create fun shapes after they cool slightly.
- Cool and Decorate: Allow the treats to cool completely. Once set, you can sprinkle them with additional sprinkles for that extra festive touch.
Chocolate Dipped Fruit Bouquets
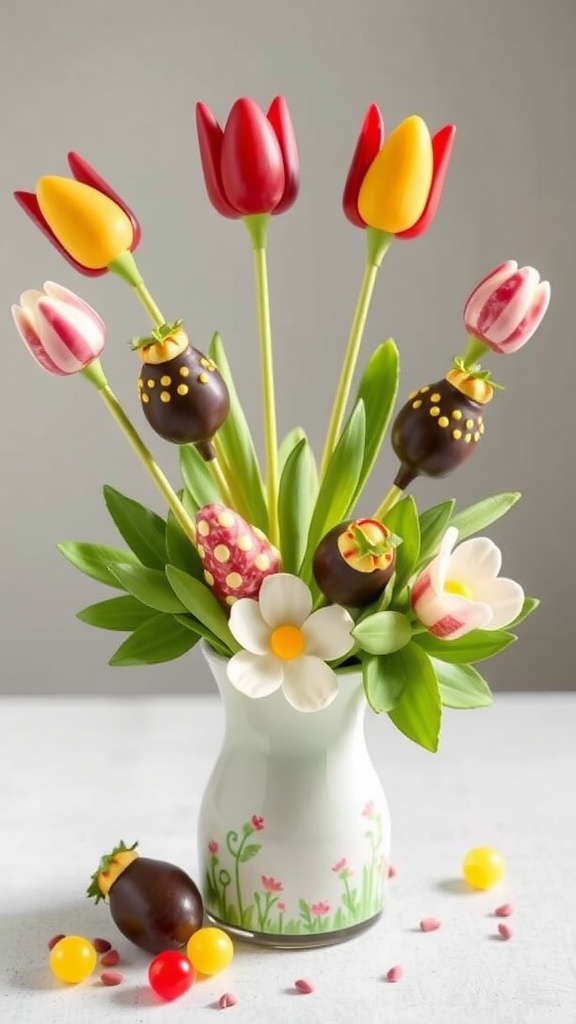
Chocolate dipped fruit bouquets are a delightful and colorful treat that combines the sweetness of fresh fruit with the rich taste of chocolate. This recipe is not only visually appealing but also incredibly easy to put together, making it a perfect addition to your Easter celebrations. You can customize the fruits and chocolates based on your preferences, ensuring every bite is a delightful surprise.
The combination of juicy strawberries, bananas, and other seasonal fruits, all beautifully dipped in smooth chocolate, creates a tasty explosion of flavors that guests will love. Plus, it adds a touch of elegance to any dessert table without requiring a ton of time or complicated techniques.
Ingredients
- 2 cups fresh strawberries
- 1 cup banana slices
- 1 cup pineapple chunks
- 8 ounces semi-sweet chocolate chips
- 1 tablespoon coconut oil (optional)
- Sprinkles or crushed nuts for topping (optional)
Instructions
- Prepare the Fruit: Rinse the strawberries and dry them thoroughly. Slice the bananas and cut the pineapple into bite-sized pieces.
- Melt the Chocolate: In a microwave-safe bowl, combine the chocolate chips and coconut oil (if using). Heat in 30-second intervals, stirring in between, until fully melted and smooth.
- Dip the Fruit: Hold each piece of fruit by the stem or skewer it with a toothpick, and dip it into the melted chocolate. Allow excess chocolate to drip off.
- Add Toppings: If desired, sprinkle with toppings like sprinkles or crushed nuts while the chocolate is still wet.
- Set and Serve: Place the dipped fruit on a baking sheet lined with parchment paper and let it set in the fridge for about 30 minutes before arranging them in a bouquet.
Bunny-shaped Cupcakes with Fluffy Frosting

Bunny-shaped cupcakes are the perfect sweet treat for your Easter celebrations. These adorable delights feature a moist cupcake base topped with fluffy frosting that kids and adults alike will enjoy. The combination of light and airy frosting with a hint of sweetness makes each bite a delightful experience.
Not only are these cupcakes tasty, but they’re also easy to make! With some simple decorating techniques, you can transform ordinary cupcakes into charming bunny creations that will impress your guests. Let’s hop into the recipe!
Ingredients
- 1 box of vanilla cake mix
- 3 large eggs
- 1 cup water
- 1/2 cup vegetable oil
- 1 cup heavy whipping cream
- 1/2 cup powdered sugar
- 1 teaspoon vanilla extract
- 4 oz white fondant
- Pink food coloring
- Black edible pearls or chocolate chips
Instructions
- Prepare the Cupcakes: Preheat your oven to 350°F (175°C). In a large bowl, combine the cake mix, eggs, water, and vegetable oil. Mix until smooth. Pour the batter into cupcake liners in a muffin tin, filling each about two-thirds full.
- Bake: Bake the cupcakes for 15-20 minutes or until a toothpick inserted comes out clean. Remove from the oven and let them cool completely.
- Make the Frosting: In a mixing bowl, whip the heavy cream until it starts to thicken. Gradually add powdered sugar and vanilla extract. Continue whipping until soft peaks form.
- Decorate: Once the cupcakes are cool, generously pipe the whipped frosting on top. Use the white fondant to shape bunny ears, coloring a portion pink for the inner ears. Place the ears on top of the frosting and add edible pearls or chocolate chips for the eyes and nose.
- Serve: Arrange your bunny cupcakes on a festive plate and enjoy the smiles they bring to your table!
Mini Lemon Meringue Tarts
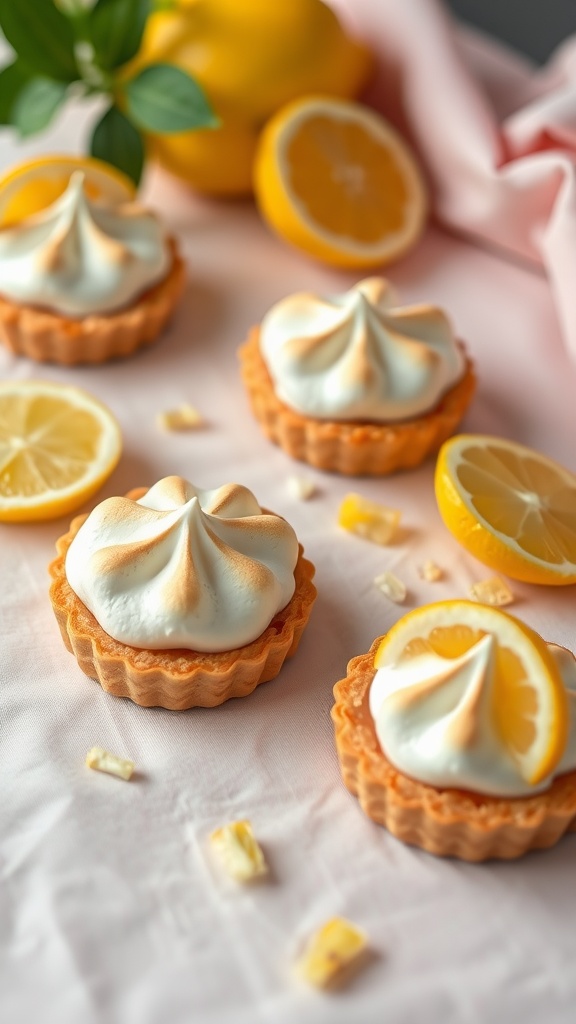
Mini lemon meringue tarts are a delightful treat that perfectly balance sweet and tangy flavors. With a crisp, buttery crust and a smooth lemon filling, these little desserts are sure to impress your guests this Easter. Topped with a fluffy meringue that’s lightly toasted, each bite is a burst of sunshine!
The recipe is straightforward, making it a fun project for bakers of all skill levels. You’ll love how the bright lemon flavor shines through, making these tarts not just delicious but also visually appealing. They’re the ideal sweet bite for spring celebrations!
Ingredients
- 1 cup all-purpose flour
- 1/4 cup granulated sugar
- 1/2 cup unsalted butter, chilled and diced
- 1 large egg yolk
- 2 tablespoons cold water
- 1 cup granulated sugar (for filling)
- 1/4 cup cornstarch
- 1/4 teaspoon salt
- 1 1/4 cups water
- 3 large egg yolks
- 1/4 cup fresh lemon juice
- 2 tablespoons lemon zest
- 1 tablespoon unsalted butter
- 3 large egg whites
- 1/4 teaspoon cream of tartar
- 1/2 teaspoon vanilla extract
Instructions
- Make the Crust: In a bowl, mix flour, sugar, and butter until crumbly. Stir in egg yolk and cold water until the dough forms. Press into tartlet pans and chill for 30 minutes.
- Pre-bake the Crusts: Preheat the oven to 350°F (175°C). Bake the crusts for 15 minutes until lightly golden. Let cool.
- Prepare the Lemon Filling: In a saucepan, combine sugar, cornstarch, and salt. Gradually add water, stirring over medium heat until thickened. Stir in egg yolks, lemon juice, zest, and butter. Cook for an additional minute, then remove from heat.
- Fill the Tarts: Pour the lemon filling into the cooled crusts.
- Make the Meringue: In a clean bowl, beat egg whites and cream of tartar until soft peaks form. Gradually add sugar and beat until stiff peaks form. Stir in vanilla.
- Top and Bake: Spread meringue over the tarts and bake for 10-15 minutes until golden brown. Let cool before serving.
Carrot Cake Pops with Cream Cheese Drizzle

Carrot cake pops are a fun and festive way to celebrate Easter! These delightful treats combine the moist, spiced goodness of carrot cake with a creamy drizzle that adds a touch of sweetness. They’re not only adorable but also simple to make, making them a great project for families or anyone looking to impress their guests.
The flavors of cinnamon, nutmeg, and carrots come together beautifully, creating a treat that feels comforting yet playful. Plus, these cake pops are easy to customize with different toppings, so you can get creative. Gather your ingredients and let’s jump into the recipe!
Ingredients
- 2 cups grated carrots
- 1 cup all-purpose flour
- 1 cup granulated sugar
- 1 teaspoon baking powder
- 1 teaspoon ground cinnamon
- 1/2 teaspoon ground nutmeg
- 1/4 teaspoon salt
- 2 large eggs
- 1/2 cup vegetable oil
- 1 teaspoon vanilla extract
- 1 cup cream cheese, softened
- 2 cups powdered sugar
- 1 tablespoon milk (optional, for thinning)
- Orange candy melts
- Green fondant or candy for decoration
Instructions
- Make the Cake: Preheat your oven to 350°F (175°C). In a bowl, mix grated carrots, flour, sugar, baking powder, cinnamon, nutmeg, and salt. In a separate bowl, whisk together eggs, oil, and vanilla. Combine both mixtures and stir until just blended.
- Bake the Cake: Pour the batter into a greased cake pan and bake for 25-30 minutes, or until a toothpick comes out clean. Let cool completely before crumbling.
- Form the Pops: Once the cake is cool, crumble it into a large bowl. Add cream cheese and mix until combined. Shape the mixture into small balls and insert lollipop sticks. Freeze for about 30 minutes to firm up.
- Coat the Pops: Melt the orange candy melts according to package instructions. Dip each cake pop into the melted candy and allow excess to drip off. Place them upright in a styrofoam block or a cake pop stand.
- Decorate: Once the coating has set, use green fondant or candy to create leaves at the top of each carrot-shaped pop. Drizzle with any remaining cream cheese mixture if desired.
- Serve and Enjoy: These carrot cake pops are ready to brighten up your Easter dessert table!
Spring Flower Sugar Cookies
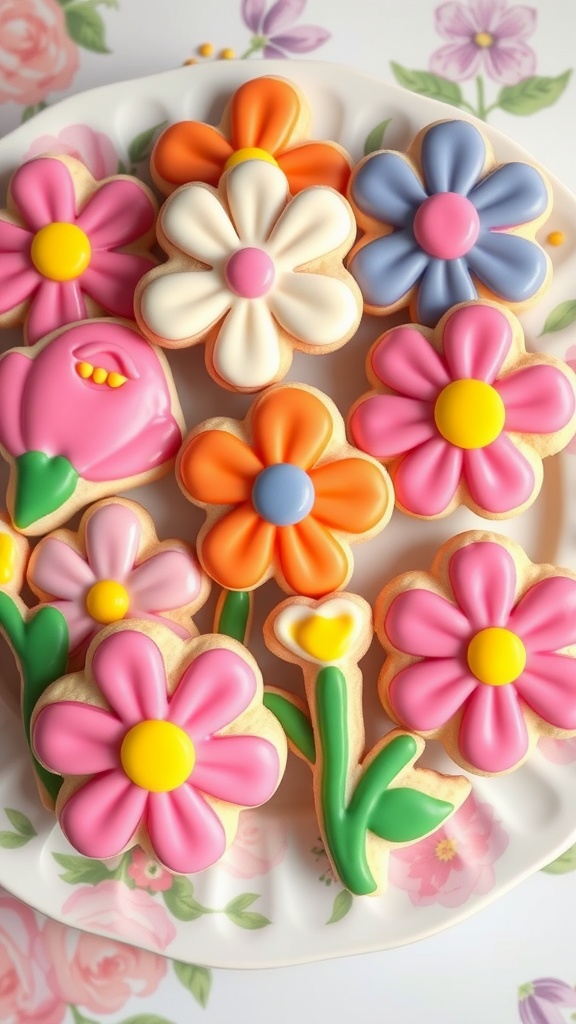
Spring Flower Sugar Cookies are a delightful treat that brings a touch of whimsy to your Easter celebrations. These cookies are soft, buttery, and topped with colorful royal icing, making them not only delicious but also visually appealing. Baking these cookies is a fun activity for both kids and adults, perfect for getting into the festive spirit!
With their vibrant colors and floral shapes, these cookies are sure to impress your guests. They are simple to make, requiring basic ingredients and a bit of creativity with icing. Let’s dive into the recipe so you can create your own batch of these charming springtime cookies!
Ingredients
- 2 ¾ cups all-purpose flour
- 1 teaspoon baking powder
- ½ teaspoon salt
- 1 cup unsalted butter, softened
- 1 ½ cups granulated sugar
- 1 large egg
- 1 teaspoon vanilla extract
- 1 teaspoon almond extract
- Royal icing in assorted colors
Instructions
- Prepare the Dough: In a bowl, whisk together the flour, baking powder, and salt. In a separate bowl, cream the butter and sugar until light and fluffy. Beat in the egg and extracts. Gradually add the dry ingredients and mix until combined.
- Chill the Dough: Divide the dough into two discs, wrap in plastic, and refrigerate for at least 1 hour to firm up.
- Roll Out the Dough: Preheat the oven to 350°F (175°C). Roll out one disc of dough on a floured surface to about ¼ inch thick. Use flower-shaped cookie cutters to cut out shapes and place them on a baking sheet lined with parchment paper.
- Bake the Cookies: Bake for 8-10 minutes, or until the edges are lightly golden. Remove from the oven and let cool on a wire rack.
- Decorate: Once cooled, use royal icing to decorate the cookies in fun spring colors. Allow the icing to set before serving.
Chocolate Egg Surprise Treats

Chocolate Egg Surprise Treats are delightful little confections that are sure to add a whimsical touch to your Easter celebrations. These treats combine rich chocolate with colorful candy, creating a fun surprise inside each bite. They are not only visually appealing but also provide a satisfying crunch and a burst of sweetness.
Making these treats is quite simple, making it a fun activity for the whole family. With just a few ingredients, you can whip up a batch that will impress your guests. Get ready to indulge in a playful dessert that captures the essence of spring!
Ingredients
- 2 cups chocolate chips
- 1 cup assorted candy-coated chocolates
- 1/2 cup mini marshmallows
- 1 teaspoon coconut oil (optional)
Instructions
- Melt the Chocolate: In a microwave-safe bowl, combine chocolate chips and coconut oil. Heat in 30-second intervals, stirring in between, until smooth.
- Prepare the Molds: Lightly grease silicone egg molds with non-stick spray. Spoon melted chocolate into each mold, ensuring even coverage on the sides. Use a brush or the back of a spoon to spread it up the sides.
- Set the Chocolate: Place the molds in the refrigerator for about 10-15 minutes until the chocolate hardens.
- Fill the Eggs: Once set, carefully remove the chocolate shells from the molds. Fill each half with a mix of assorted candy-coated chocolates and mini marshmallows.
- Seal the Eggs: Use more melted chocolate to seal the halves together. Let them set in the refrigerator for another 10 minutes.
- Serve and Enjoy: Once fully set, your Chocolate Egg Surprise Treats are ready to serve! Display them on a decorative plate for an eye-catching centerpiece.
Easter Egg Cheesecake Bites
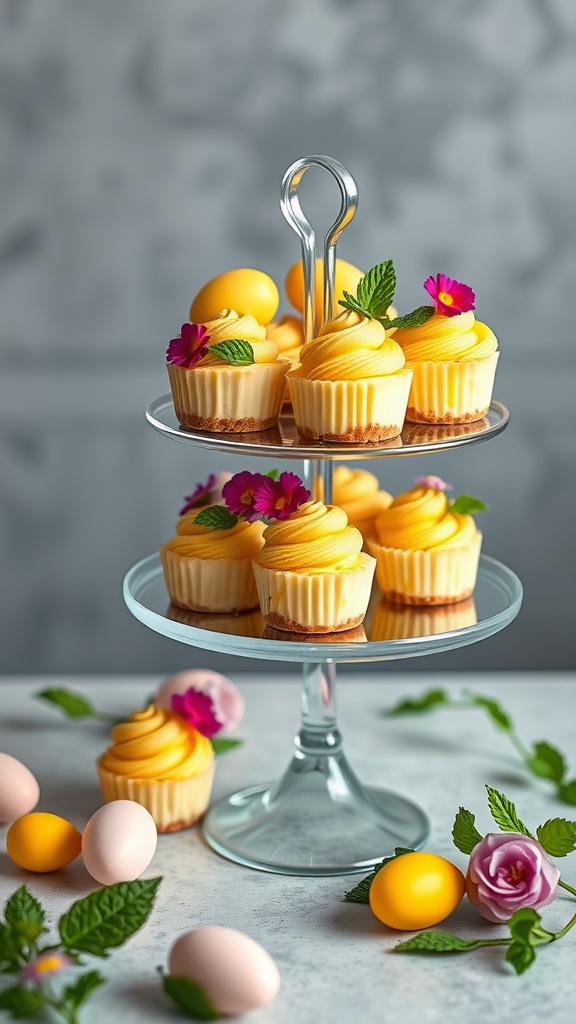
These Easter Egg Cheesecake Bites are a delightful twist on traditional cheesecake, perfect for celebrating the holiday. With a creamy filling nestled in a buttery crust, each bite is rich and satisfying, while the festive decorations make them a joy to serve. They’re easy to whip up, making them a great choice for those looking to impress without spending all day in the kitchen.
The combination of sweet cheesecake and a hint of lemon zest creates a refreshing flavor profile that’s sure to please your guests. Plus, the bright colors and cute decorations will bring a festive touch to your dessert table. Let’s dive into the recipe!
Ingredients
- 1 cup crushed graham crackers
- 1/4 cup unsalted butter, melted
- 2 cups cream cheese, softened
- 1/2 cup granulated sugar
- 1 teaspoon vanilla extract
- 2 large eggs
- 1 teaspoon lemon zest
- 1/4 teaspoon salt
- Yellow food coloring (optional)
- Decorative eggs and edible flowers for topping
Instructions
- Prepare the Crust: Preheat the oven to 325°F (160°C). In a bowl, combine crushed graham crackers and melted butter. Press the mixture firmly into the bottom of mini muffin tins to form the crust.
- Mix the Filling: In another bowl, beat together the cream cheese, sugar, and vanilla until smooth. Add the eggs one at a time, mixing well after each addition. Stir in lemon zest and salt. If desired, add yellow food coloring to give the cheesecake a cheerful hue.
- Fill the Tins: Pour the cheesecake mixture over the crusts, filling each cup about 3/4 full. Bake for 15-20 minutes, or until the centers are set but still slightly jiggly.
- Cool: Remove from oven and let them cool at room temperature. Once cooled, chill in the refrigerator for at least 2 hours.
- Decorate: Before serving, top with decorative eggs and edible flowers to enhance the festive look. Enjoy!
Vanilla Bean Pudding Cups with Bunny Toppers
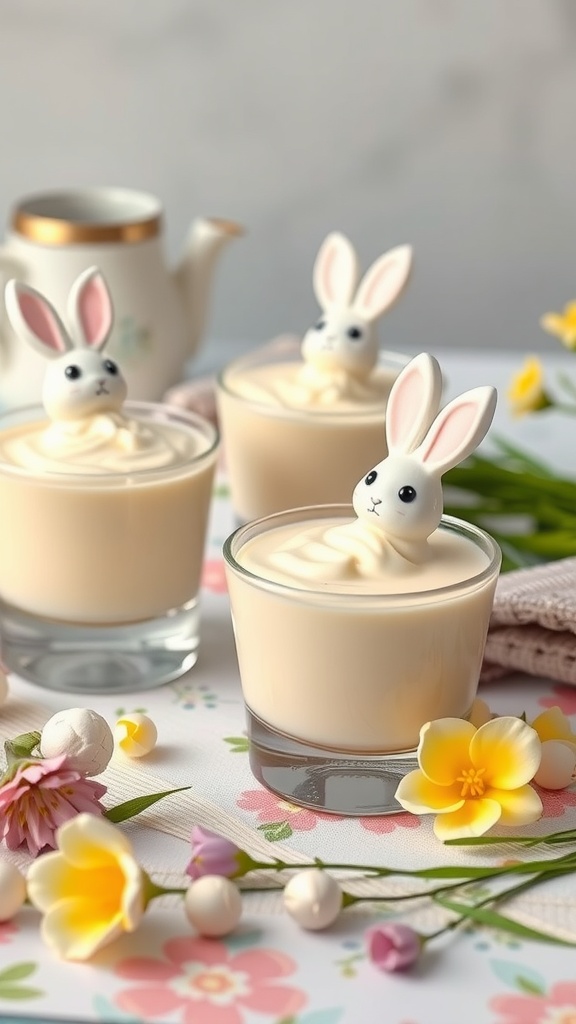
These Vanilla Bean Pudding Cups are a delightful treat that bring a touch of whimsy to your Easter celebrations. The creamy, smooth pudding is infused with real vanilla, creating a rich and comforting flavor that everyone will love. Topped with adorable bunny decorations, these cups are both sweet and charming, making them a hit for both kids and adults alike.
This recipe is simple to follow, requiring just a few ingredients and minimal prep time. It’s a fun way to add a festive element to your dessert table without a lot of fuss. Perfect for gatherings, these pudding cups will definitely impress your guests!
Ingredients
- 2 cups whole milk
- 1/2 cup granulated sugar
- 1/4 cup cornstarch
- 1/4 teaspoon salt
- 1 tablespoon unsalted butter
- 2 teaspoons vanilla bean paste or extract
- Whipped cream for topping
- Bunny toppers or decorations
Instructions
- In a medium saucepan, whisk together the sugar, cornstarch, and salt. Gradually add the milk, stirring to combine.
- Cook over medium heat, constantly stirring, until the mixture thickens and begins to bubble, about 5-7 minutes.
- Remove from heat and stir in the butter and vanilla bean paste until well combined.
- Pour the pudding into individual cups or bowls and let it cool to room temperature. Cover with plastic wrap and refrigerate for at least 2 hours.
- Before serving, top each pudding cup with whipped cream and place the bunny toppers on top for a festive finish.
Peeps S’mores Dip

Peeps S’mores Dip is a fun and festive way to enjoy the classic flavors of s’mores without the need for a campfire. This delicious treat combines gooey marshmallows, rich chocolate, and crispy graham crackers, all topped off with colorful Peeps that add a playful twist to your dessert table. It’s sweet, creamy, and just the right amount of messy—perfect for sharing!
Making this dip is super simple and takes just a few minutes to prepare. All you need to do is layer your ingredients in a baking dish and pop them in the oven. Serve it warm with graham crackers or fruit for dipping, and watch it disappear at your Easter gathering!
Ingredients
- 2 cups milk chocolate chips
- 1 cup mini marshmallows
- 1 cup Peeps (various colors)
- 1 cup whipped topping
- 1 cup graham cracker crumbs
- 1 tablespoon butter (melted)
Instructions
- Preheat your oven to 350°F (175°C).
- In a mixing bowl, combine the melted butter and graham cracker crumbs until well mixed. Press the mixture firmly into the bottom of an oven-safe dish to create a crust.
- Layer the chocolate chips evenly over the graham cracker crust, followed by the mini marshmallows.
- Spread the whipped topping over the marshmallows, then arrange the Peeps on top for decoration.
- Bake in the preheated oven for about 15 minutes, or until the marshmallows are golden and the chocolate is melted.
- Remove from the oven and let cool slightly before serving with extra graham crackers or sliced fruit for dipping.
Peanut Butter Egg Truffles
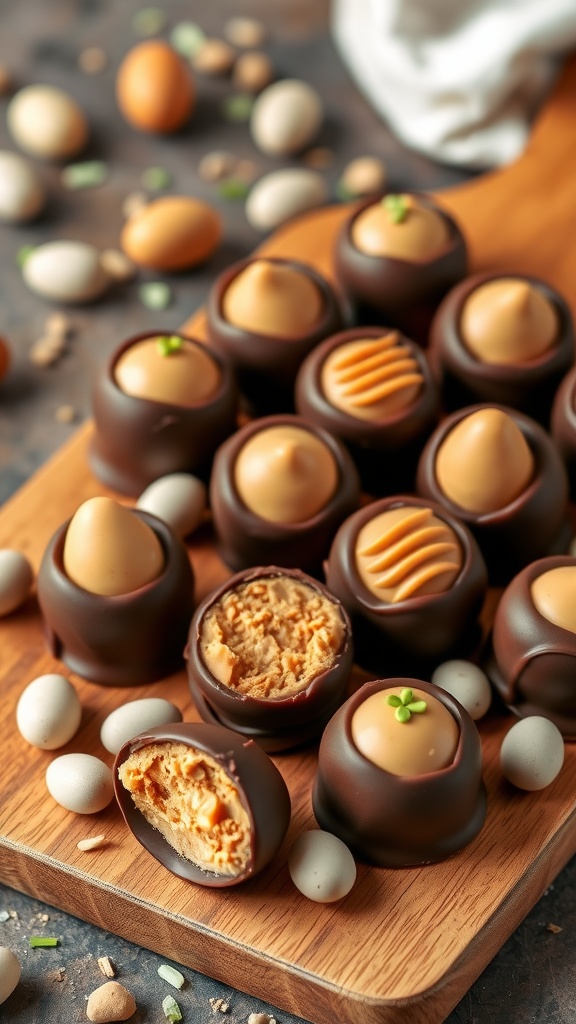
These Peanut Butter Egg Truffles are a delightful treat that captures the essence of Easter in every bite. With a creamy, rich peanut butter filling coated in smooth chocolate, they offer a perfect balance of flavors, making them a hit among both kids and adults. The combination of sweet and nutty notes creates a mouthwatering experience that’s hard to resist.
Not only do these truffles taste amazing, but they’re also simple to make. With just a few ingredients and minimal prep time, you can whip up a batch and impress your guests. Whether you’re hosting an Easter gathering or simply looking for a fun dessert, these truffles are sure to brighten up your celebration!
Ingredients
- 1 cup creamy peanut butter
- 1/2 cup powdered sugar
- 1/4 cup graham cracker crumbs
- 1/2 teaspoon vanilla extract
- 2 cups semi-sweet chocolate chips
- 1 tablespoon coconut oil
Instructions
- Make the Filling: In a mixing bowl, combine peanut butter, powdered sugar, graham cracker crumbs, and vanilla extract. Stir until the mixture is smooth and well combined.
- Shape the Truffles: Using your hands, form the mixture into small egg shapes and place them on a parchment-lined baking sheet. Freeze for about 30 minutes until firm.
- Melt the Chocolate: In a microwave-safe bowl, heat the chocolate chips and coconut oil in 30-second intervals, stirring in between until melted and smooth.
- Coat the Truffles: Dip each peanut butter egg into the melted chocolate, allowing any excess chocolate to drip off. Return them to the baking sheet and let them set until the chocolate hardens.
- Serve: Once the chocolate has completely set, serve your Peanut Butter Egg Truffles and enjoy the smiles they bring!
Easter Basket Brownie Bites
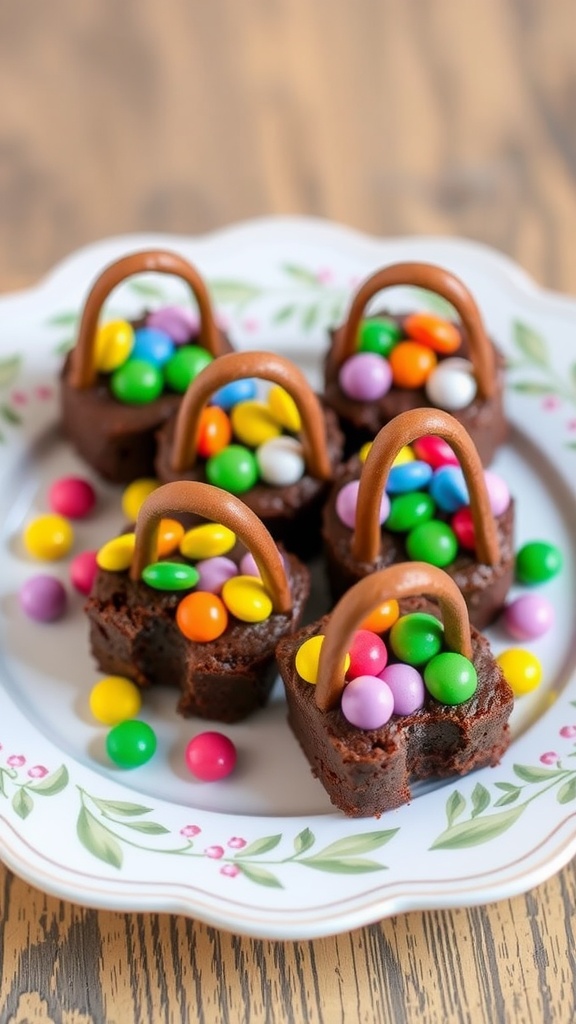
Easter Basket Brownie Bites are a delightful twist on traditional brownies, perfect for celebrating the holiday with a fun and festive touch. These mini treats are not only rich and fudgy but also decorated to resemble little baskets filled with colorful candy eggs, making them a visual and tasty treat for guests of all ages.
They’re simple to make, requiring just a few ingredients and minimal baking skills. Whether you’re preparing for a family gathering or a festive brunch, these brownie bites will surely bring smiles and add a sweet touch to your Easter celebration.
Ingredients
- 1 box of brownie mix
- 1/4 cup vegetable oil
- 2 large eggs
- 1/2 cup chocolate frosting
- 1 cup chocolate candy melts
- Colorful candy eggs (such as Cadbury Mini Eggs)
- Edible chocolate strings or licorice for handles
Instructions
- Preheat your oven according to the brownie mix instructions and prepare a mini muffin tin with cooking spray.
- In a bowl, combine the brownie mix, vegetable oil, and eggs. Stir until well blended.
- Spoon the brownie batter into the mini muffin tin, filling each cup about two-thirds full. Bake according to the package instructions.
- Once baked, remove the brownie bites from the oven and allow them to cool completely.
- While the brownie bites cool, melt the chocolate candy melts according to package directions. Dip the tops of the cooled brownie bites into the melted chocolate to create a shiny glaze.
- Before the chocolate sets, use the chocolate strings or licorice to create basket handles on top of each brownie bite.
- After the chocolate has fully hardened, fill each brownie basket with colorful candy eggs.
- Serve and enjoy your delightful Easter Basket Brownie Bites!
Fruit and Yogurt Parfaits in Easter Colors

Fruit and yogurt parfaits are a delightful way to celebrate Easter with vibrant colors and fresh flavors. These treats are not only visually appealing but also healthy and easy to make. Layering creamy yogurt with a variety of fruits creates a delicious combination that will impress your guests and satisfy your sweet tooth.
The great thing about these parfaits is that you can customize them with your favorite fruits and yogurt flavors. Whether you prefer tart berries or sweet tropical fruits, the options are endless. Plus, they can be prepared in advance, making them a stress-free dessert option for your Easter gathering!
Ingredients
- 2 cups Greek yogurt (plain or flavored)
- 1 cup strawberries, sliced
- 1 cup blueberries
- 1 cup kiwi, diced
- 1 cup pineapple, diced
- 1/4 cup honey or maple syrup (optional)
- Granola for topping
- Colorful sprinkles (optional)
Instructions
- Prepare the Yogurt: If using plain yogurt, mix in honey or maple syrup to sweeten it to your taste.
- Layer the Parfaits: In clear glasses or cups, start by adding a layer of yogurt at the bottom.
- Add Fruit: Next, add a layer of sliced strawberries, followed by blueberries, kiwi, and pineapple. Repeat the layers until the glasses are full.
- Top It Off: Finish with a dollop of yogurt on top, then sprinkle granola and colorful sprinkles for a festive touch.
- Serve: Keep the parfaits refrigerated until you’re ready to serve them. Enjoy your delightful fruit and yogurt parfaits!
Conclusion & Final Thoughts:
Easter is the perfect time to get creative in the kitchen, and these 13 cute Easter desserts prove that a little imagination goes a long way. Each treat on this list brings a playful, festive twist to classic flavors, making them ideal for sharing with family and friends. Whether you’re crafting a full dessert spread or just want a single show-stopping item, there’s a sweet surprise here for every kind of celebration.
Remember, it’s not just about the ingredients—it’s about the joy of creating something special and seeing the smiles that follow. So don’t be afraid to add your own personal touch to these recipes. After all, the best desserts aren’t just delicious—they’re made with love and a sprinkle of holiday magic.
Happy Easter and happy baking!