Grandma Old Fashioned Fudge is a timeless treat that brings back fond memories of family gatherings and holiday celebrations. This rich and creamy fudge is made with simple ingredients that come together to create a melt-in-your-mouth confection that’s perfect for any occasion. Its appeal lies in its nostalgic flavor and texture, making it a favorite among chocolate lovers of all ages.
Why You Will Love This Recipe
This fudge recipe captures the essence of homemade goodness with its smooth, decadent chocolate flavor and sweet, buttery notes. It’s incredibly easy to make, requiring just a few pantry staples and minimal cooking skills. Whether you’re a seasoned baker or a novice in the kitchen, this recipe is approachable and forgiving. It fits perfectly into any lifestyle, allowing you to indulge your sweet tooth without the fuss of store-bought options. Plus, it’s an excellent way to bond with family while creating delicious memories together.
Tips and Tricks
To ensure your fudge turns out perfectly every time, here are some useful tips and tricks:
- Use a candy thermometer: This will help you achieve the perfect temperature for the fudge, ensuring a smooth texture.
- Prep your pan: Line your baking dish with parchment paper for easy removal and cleanup.
- Stir gently: Avoid over-stirring the mixture after it reaches the boiling point to keep the texture silky.
- Add flavorings: Consider adding a pinch of sea salt or a splash of vanilla extract right before pouring the fudge into the pan for an extra layer of flavor.
Common Mistakes to Avoid
When making fudge, there are some common pitfalls to watch out for:
- Overcooking: Cooking the mixture too long can lead to grainy fudge. Keep an eye on the temperature!
- Not cooling properly: If you don’t let the fudge cool completely before cutting, it may not set properly.
- Skipping the thermometer: Trusting your instincts instead of using a thermometer can lead to inconsistent results.
Make Ahead Tips
This fudge can be made in advance, making it an excellent treat for busy schedules. You can prepare the fudge up to a week ahead of time. Just allow it to cool completely, then store it in an airtight container at room temperature. If you wish to store it longer, refrigerating it can extend its freshness for up to two weeks.
Recipe Variations
Feel free to experiment with this classic recipe by incorporating different ingredients:
- Nutty fudge: Add chopped walnuts or pecans for added crunch.
- Flavor twists: Incorporate peppermint extract for a holiday twist or swirl in peanut butter for a rich, creamy variation.
- Marshmallow swirl: Fold in mini marshmallows just before the fudge sets for a fun, fluffy texture.
How to Serve
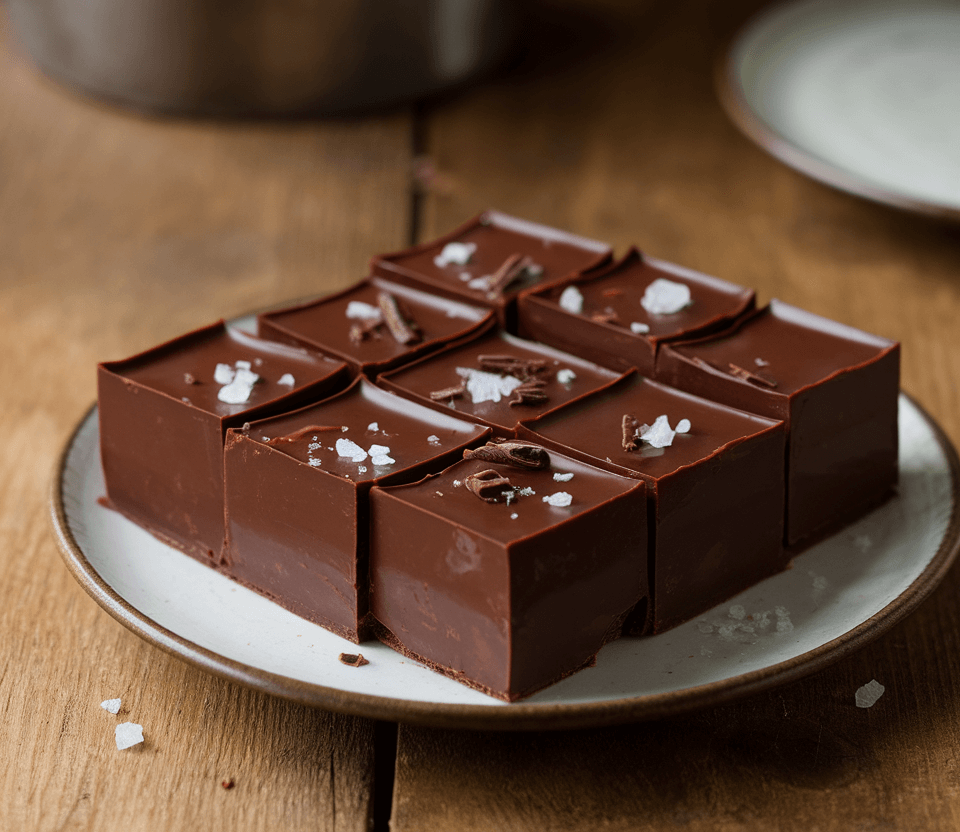
Once your fudge has cooled and set, cut it into small squares or rectangles for serving. For an elegant presentation, arrange the pieces on a decorative platter lined with parchment paper. You can also sprinkle some sea salt on top or drizzle with melted chocolate for added flair.
Pairing Suggestions
Enhance your fudge experience with these pairing suggestions:
- Beverages: A cup of rich coffee or a glass of cold milk complements the sweetness perfectly. For adults, a sweet dessert wine or a chocolate martini can elevate the experience.
- Side desserts: Serve alongside vanilla ice cream or fresh berries for a delightful contrast in flavors and textures.
How to Store
Store your leftover fudge in an airtight container at room temperature for up to a week. If you want to keep it longer, wrap it tightly in plastic wrap and place it in the refrigerator for up to two weeks. To freeze, cut the fudge into squares and place them in an airtight container separated by parchment paper. It can last for up to three months in the freezer.
Equipment Needed
You will need the following kitchen tools:
- A heavy-bottomed saucepan, which helps distribute heat evenly.
- A candy thermometer to monitor the fudge temperature.
- A spatula for stirring and smoothing the fudge.
- A baking dish (8×8 inches works well) lined with parchment paper.
Dietary Adaptations
For those with dietary restrictions, consider these adaptations:
- Vegan: Substitute dairy with coconut milk and replace butter with coconut oil.
- Dairy-free: Use non-dairy chocolate chips and a dairy-free milk alternative.
- Nut-free: Ensure chocolate and other add-ins are free from nuts.
Seasonal Adaptations
While this fudge is delightful year-round, you can enhance the seasonal vibe:
- Fall: Stir in pumpkin spice or crushed candy corn for a festive touch.
- Winter: Add crushed peppermint or holiday-themed sprinkles for a seasonal flair.
Cost Breakdown
The estimated cost for making this fudge is around $10 for the whole batch, yielding about 24 pieces. This breaks down to about $0.40 per serving. For a budget-friendly option, consider using store-brand ingredients or substituting chocolate chips with cocoa powder mixed with coconut oil.
Kitchen Hacks
To make the fudge-making process quicker and cleaner:
- Melt chocolate evenly: Use a double boiler or microwave in short bursts, stirring in between to prevent burning.
- Easier cleanup: Soak your saucepan in warm, soapy water immediately after use to make scrubbing easier.
Recipe FAQs
Can I use sweetened condensed milk instead of regular milk?
Yes, sweetened condensed milk can create a creamier fudge, but you might want to reduce the sugar in the recipe.
How do I know when the fudge is done?
Use a candy thermometer to check for a temperature of 234°F to 240°F (soft-ball stage).
Can I substitute dark chocolate for semi-sweet?
Absolutely! Dark chocolate will give your fudge a richer flavor, but adjust the sugar accordingly if it’s unsweetened.
Grandma Old Fashioned Fudge

Grandma Old Fashioned Fudge is a timeless treat that brings back fond memories of family gatherings and holiday celebrations. This rich and creamy fudge is made with simple ingredients that come together to create a melt-in-your-mouth confection that’s perfect for any occasion.
Ingredients
- 2 cups granulated sugar
- 1 cup whole milk
- 1/2 cup unsweetened cocoa powder
- 1/4 cup unsalted butter
- 1 teaspoon vanilla extract
- Pinch of salt
- 1 cup semi-sweet chocolate chips
Instructions
- In a heavy-bottomed saucepan, combine sugar, milk, cocoa powder, and butter over medium heat.
- Stir the mixture until the sugar dissolves and it begins to boil.
- Attach a candy thermometer to the pan and continue to cook without stirring until it reaches 234°F (soft-ball stage).
- Remove from heat and stir in the vanilla extract, salt, and chocolate chips until melted and smooth.
- Pour the mixture into a lined baking dish and smooth the top with a spatula.
- Let the fudge cool at room temperature for about 2 hours until set.
- Cut into squares and serve.
Nutrition Information
Yield
24Serving Size
1Amount Per Serving Calories 130Total Fat 5gSaturated Fat 3gTrans Fat 0gUnsaturated Fat 2gCholesterol 6mgSodium 11mgCarbohydrates 23gFiber 1gSugar 21gProtein 1g
TastyFitnessRecipes.com, occasionally offers nutritional information for recipes contained on this site. This information is provided as a courtesy and is an estimate only. This information comes from online calculators. Although tastyfitnessrecipes.com attempts to provide accurate nutritional information, these figures are only estimates.
Final Thoughts
Making grandma’s old-fashioned fudge recipe is not just about the end product, but the joy of creating something delicious and cherished. With its rich flavors and smooth texture, this fudge is bound to become a beloved favorite in your household as well. So gather your loved ones, whip up a batch, and enjoy the sweet memories that come with every bite!