This Bisquick Cobbler recipe is a delightful, warm dessert that brings comfort and nostalgia to any table. With its fluffy, cake-like topping and juicy fruit filling, it’s an effortless way to satisfy your sweet tooth. Perfect for family gatherings, potlucks, or a cozy night in, this cobbler is sure to impress both friends and family alike.
Why You Will Love This Recipe
You will love this bisquick cobbler recipe because it strikes the perfect balance between simplicity and flavor. Using just a few pantry staples, this recipe comes together quickly, making it ideal for busy weeknights or last-minute gatherings. The beauty of this cobbler lies in its versatility; you can swap out the fruits based on what you have on hand or what’s in season. Plus, it’s a crowd-pleaser, with a comforting texture that feels like a warm hug in dessert form.
Tips and Tricks
To elevate your bisquick cobbler, consider the following tips and tricks:
- Use fresh fruit when possible, as it enhances the flavor and adds a delightful texture.
- If using frozen fruit, thaw and drain it properly to avoid excess liquid in your cobbler.
- For a touch of sophistication, add a sprinkle of cinnamon or nutmeg to the batter.
- Want to save time? Mix the batter in advance and store it in the fridge until you’re ready to bake.
- Don’t hesitate to experiment with different fruits, such as peaches, blueberries, or even mixed berries.
Common Mistakes to Avoid
Here are some common pitfalls to avoid when making bisquick cobbler:
- Overmixing the batter can lead to a dense cobbler instead of a light and fluffy one. Mix until just combined.
- Not greasing the baking dish can result in the cobbler sticking. Use butter or cooking spray to ensure easy removal.
- Skipping the resting time can prevent the flavors from melding together. Let it cool slightly before serving to allow the juices to settle.
Make Ahead Tips
For those who like to prep ahead, this bisquick cobbler can be partially made in advance:
- Prepare the fruit filling and store it in the fridge for up to 2 days. This allows the flavors to intensify.
- The batter can also be mixed and kept in the fridge for a day. Just give it a quick stir before pouring it over the fruit.
- Once baked, cobbler can stay fresh at room temperature for up to 2 days, but for longer storage, consider refrigerating it.
Recipe Variations
There are numerous ways to customize your bisquick cobbler:
- Swap the Bisquick for a gluten-free baking mix for a gluten-free version.
- Try different fruits such as cherries, apples, or even rhubarb for varied flavors.
- For a tropical twist, use pineapple or mango and add a splash of coconut milk to the batter.
- Consider adding a layer of nuts or oats on top for a crunchy texture.
How to Serve
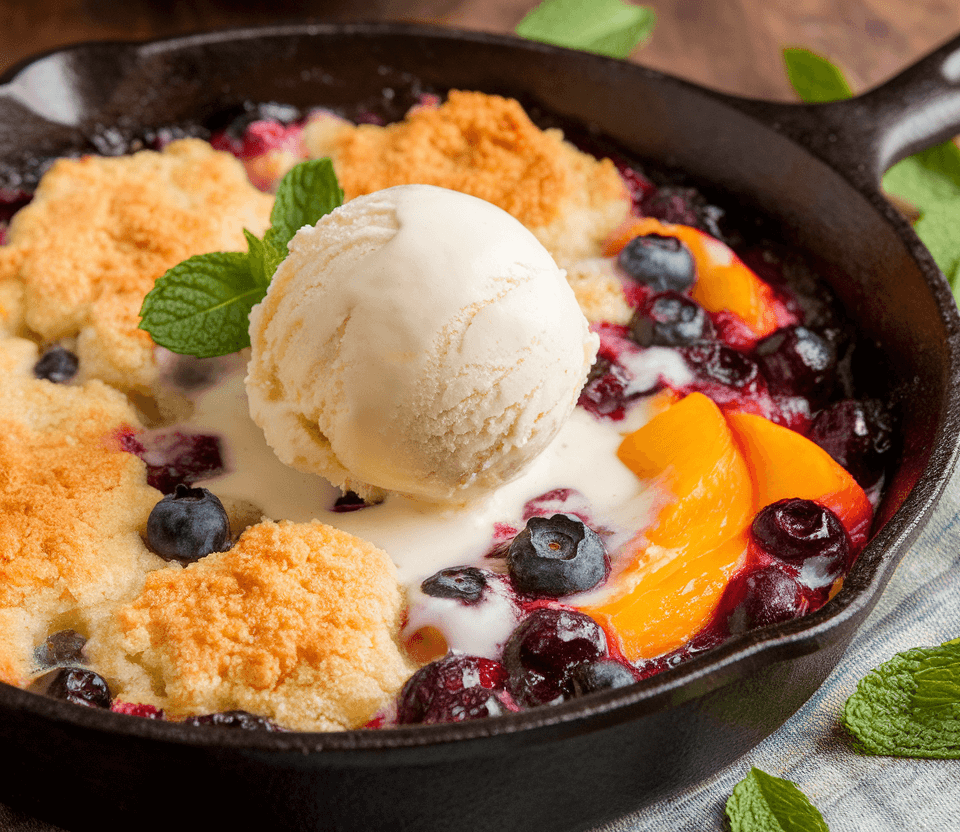
Serve your bisquick cobbler warm, straight from the oven. A scoop of vanilla ice cream or a dollop of whipped cream on top will take it to the next level. For a rustic presentation, serve it directly in the baking dish, garnished with a sprinkle of powdered sugar or a few fresh berries on the side.
Pairing Suggestions
Pair your bisquick cobbler with a variety of drinks and sides:
- A chilled glass of sweet iced tea or a light, fruity white wine like Moscato complements the dessert beautifully.
- Consider serving it alongside a scoop of vanilla ice cream or a slice of cheddar cheese for a delightful contrast.
- For a cozy touch, a steaming cup of chai tea or coffee pairs perfectly with the warm cobbler.
How to Store
To store leftovers, allow the cobbler to cool completely, then cover it with plastic wrap or transfer it to an airtight container. It can be kept in the refrigerator for up to 4 days. For longer storage, consider freezing individual portions. Wrap them tightly in foil or freezer-safe bags, and they will stay good for up to 3 months. Reheat in the oven or microwave until warmed through.
Equipment Needed
You will need the following kitchen tools for this bisquick cobbler recipe:
- A 9×13-inch baking dish or a cast iron skillet for an authentic touch.
- Mixing bowls for combining the ingredients.
- A whisk or wooden spoon for mixing the batter.
- Measuring cups and spoons for accurate ingredient measurements.
Dietary Adaptations
For those with dietary restrictions, here are some adaptations:
- To make it vegan, substitute the milk with almond or oat milk and use a flax egg (1 tablespoon ground flaxseed + 2.5 tablespoons water).
- For a dairy-free version, use coconut milk or any non-dairy alternative.
- Nut allergies can be accommodated by ensuring your baking mix is nut-free and using non-nut oils.
Seasonal Adaptations
Take advantage of seasonal fruits to enhance your cobbler:
- In the spring, use strawberries or rhubarb.
- Summer is perfect for peaches and blueberries.
- Autumn brings apples and pears, while winter is a great time for frozen berries or citrus.
Cost Breakdown
This bisquick cobbler is budget-friendly, with an estimated cost of around $1.50 per serving. By using seasonal fruits or frozen alternatives, you can keep costs down even further. Consider buying in bulk or using coupons for Bisquick and fresh fruit to save even more.
Kitchen Hacks
Here are some quick kitchen hacks for making your bisquick cobbler:
- To easily peel peaches, blanch them in boiling water for 30 seconds and then shock in ice water. The skins will slide right off!
- Use a pastry cutter or two forks to mix the batter quickly and keep it light and airy.
- If you’re short on time, a quick zap in the microwave can help soften hard fruits like apples for your filling.
Recipe FAQs
Can I use regular flour instead of Bisquick?
You can, but you will need to add additional baking powder and salt to mimic the Bisquick mix.
How long does it take to bake?
Typically, it takes about 30-40 minutes at 350°F, but always check for a golden top and bubbly fruit filling.
What fruits work best?
Berries, peaches, and apples are traditional choices, but feel free to experiment with your favorites!
Bisquick Cobbler

This Bisquick Cobbler recipe is a delightful, warm dessert that brings comfort and nostalgia to any table.
Ingredients
- 2 cups fresh or frozen fruit (such as peaches, blueberries, or cherries)
- 1 cup Bisquick mix
- 1 cup milk (or dairy-free alternative)
- 1/2 cup sugar (adjust based on fruit sweetness)
- 1/4 cup butter, melted
- 1 teaspoon vanilla extract
- 1 teaspoon cinnamon (optional)
Instructions
- Preheat your oven to 350°F (175°C).
- In a mixing bowl, combine your fruit with 1/4 cup of sugar and set aside.
- In another bowl, mix together the Bisquick mix, milk, melted butter, remaining sugar, vanilla extract, and cinnamon until just combined.
- Pour the fruit mixture into a greased 9×13-inch baking dish or cast iron skillet.
- Carefully spoon the batter over the fruit, ensuring it covers as much of the fruit as possible.
- Bake in the preheated oven for 30-40 minutes, or until the top is golden brown and bubbly.
- Allow to cool for 10 minutes before serving warm.
Nutrition Information
Yield
8Serving Size
1Amount Per Serving Calories 138Total Fat 6gSaturated Fat 4gTrans Fat 0gUnsaturated Fat 2gCholesterol 18mgSodium 61mgCarbohydrates 20gFiber 1gSugar 18gProtein 1g
TastyFitnessRecipes.com, occasionally offers nutritional information for recipes contained on this site. This information is provided as a courtesy and is an estimate only. This information comes from online calculators. Although tastyfitnessrecipes.com attempts to provide accurate nutritional information, these figures are only estimates.
Final Thoughts
In conclusion, this bisquick cobbler recipe is a deliciously simple way to bring a taste of home to your kitchen. Whether you’re baking it for a special occasion or a cozy night in, this dessert is sure to warm hearts and satisfy cravings. I hope you enjoy making it as much as I do, and don’t forget to share your creations! Happy baking!