Oreo Dirt Pudding is a delightful dessert that captures the nostalgia of childhood while bringing a sophisticated twist to your table. This no-bake treat layers creamy chocolate pudding, whipped topping, and crushed Oreo cookies, creating a mouthwatering experience that is as visually appealing as it is delicious. The combination of textures—from the smooth pudding to the crunchy cookie crumbles—makes it a favorite for both kids and adults alike. Whether you’re serving it at a birthday party, a family gathering, or just a cozy night in, this Oreo dirt pudding recipe is sure to be a hit.

Why You Will Love This Recipe
There are countless reasons to fall in love with this Oreo dirt pudding recipe. First and foremost, the flavor is absolutely irresistible. The rich chocolate pudding pairs perfectly with the sweet creaminess of whipped topping and the unmistakable taste of Oreos, creating a dessert that feels indulgent without being overly complicated. Plus, it’s a no-bake recipe, which means minimal effort and maximum enjoyment—perfect for busy weeknights or last-minute gatherings. This dessert also accommodates various lifestyles; it can easily be made gluten-free by using gluten-free Oreos or even dairy-free with the right substitutions.
Tips and Tricks
To ensure your Oreo dirt pudding turns out perfectly, here are some handy tips and tricks:
- Crush the Oreos efficiently: Place the Oreos in a resealable plastic bag and crush them with a rolling pin for a mess-free experience. You can also pulse them in a food processor for a finer crumb.
- Use instant pudding mix: This recipe calls for instant pudding mix, which sets quickly and eliminates the need for cooking. Just whisk it with cold milk until it thickens.
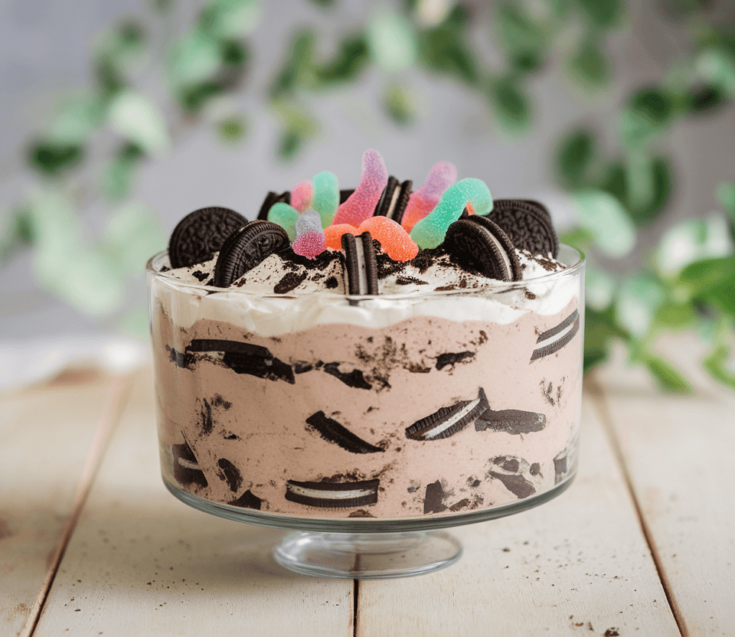
- Layer it right: For a visually appealing dessert, layer the pudding, whipped topping, and crushed Oreos in a clear trifle dish or individual cups, allowing guests to see those beautiful layers.
- Let it chill: After assembling, let the pudding sit in the refrigerator for at least an hour to allow the flavors to meld and the dessert to firm up.
Common Mistakes to Avoid
When making Oreo dirt pudding, it’s easy to make a few common mistakes:
- Skipping the chilling time: This dessert benefits significantly from chilling, as it allows the flavors to blend and the pudding to set properly. Don’t rush this step!
- Using the wrong type of pudding: Make sure to use instant pudding mix, not cook-and-serve, as the latter will not set correctly in the refrigerator.
- Over-mixing the whipped topping: When folding the whipped topping into the pudding, be gentle to retain the airy texture. Over-mixing can lead to a denser pudding.
- Not crushing Oreos finely enough: Ensure that the Oreos are crushed well so they can evenly distribute throughout the pudding and create that signature dirt effect.
Make Ahead Tips
One of the best parts about this Oreo dirt pudding recipe is how well it can be made ahead of time. You can prepare the pudding and crushed Oreos a day in advance. Just store the pudding in an airtight container in the refrigerator and crush the Oreos just before assembling to maintain their crunch. The assembled dessert will keep well in the refrigerator for up to three days, making it a great option for meal preppers and busy cooks.
Recipe Variations
There are many fun ways to customize this Oreo dirt pudding recipe:
- Flavor swaps: Try using different flavors of pudding mix, such as vanilla or cheesecake, for a unique twist.
- Add-ins: Consider folding in mini marshmallows, gummy worms, or even chocolate chips for added texture and flavor.
- Alternative cookies: Swap out Oreos for other sandwich cookies, such as chocolate mint or peanut butter, to change up the flavor profile.
- Layering: Instead of a traditional layered dessert, create single-serving cups or jars for a fun presentation at parties.
How to Serve
To serve your Oreo dirt pudding, present it in a beautiful trifle dish or individual cups for a charming touch. Garnish with a dollop of whipped topping and a sprinkle of crushed Oreos on top. For an extra festive touch, you can add gummy worms peeking out of the “dirt” for a whimsical effect, especially if you’re serving it at a kids’ party. Pair it with fresh strawberries or raspberries on the side for a pop of color and balance.
Pairing Suggestions
For drink pairings, consider serving this dessert with a cold glass of milk or a rich hot chocolate to enhance the chocolate flavors. If you prefer something a bit more sophisticated, a sweet dessert wine like Moscato or a creamy coffee liqueur can complement the dessert beautifully. As for side dishes, light fruit salads or vanilla ice cream can provide a refreshing contrast to the rich pudding.
How to Store
To store leftovers, keep the Oreo dirt pudding in an airtight container in the refrigerator. It will stay fresh for up to three days. If you have not yet assembled the pudding, you can store the individual components separately for up to five days. However, it is not recommended to freeze this dessert, as the texture of the pudding and whipped topping may change once thawed.
Equipment Needed
While this recipe is simple and requires minimal equipment, here’s what you’ll need:
- Mixing bowls
- Whisk or electric mixer
- Resealable plastic bag or food processor for crushing Oreos
- Trifle dish or individual serving cups for assembly
- Spatula for folding ingredients
Dietary Adaptations
To make this Oreo dirt pudding recipe more inclusive, consider these adaptations:
- Vegan: Use plant-based milk and vegan whipped topping. Ensure the Oreos you choose are dairy-free.
- Gluten-Free: Opt for gluten-free Oreos to make this dessert suitable for those with gluten sensitivities.
- Nut-Free: Stick to standard ingredients, as Oreos are generally nut-free, but always check labels for cross-contamination.
Seasonal Adaptations
Depending on the season, you can modify the recipe with seasonal flavors. In the fall, add a hint of pumpkin spice to the pudding or top the dessert with candied pecans. In the summer, consider folding in fresh berries or even a layer of fruit puree to lighten the dessert and add a refreshing twist.
Cost Breakdown
This Oreo dirt pudding recipe is as budget-friendly as it is delicious. On average, you can make a large batch for around $15, which yields about 8 servings, making it approximately $1.88 per serving. To save costs, consider using store brands for pudding mix and whipped topping, and always check for sales on Oreos.
Kitchen Hacks
Here are some quick kitchen hacks to streamline your Oreo dirt pudding process:
- Effortless whipping: Chill your mixing bowl and beaters before whipping cream for a quicker, fluffier result.
- Quick Oreo crumbs: If you’re short on time, you can use a rolling pin to crush Oreos directly in the package—just be sure to seal it well first!
- Quick clean-up: Line your mixing bowl with plastic wrap before adding ingredients. Once you’re done, just lift the wrap out, and you’ll have less to clean!
Recipe FAQs
Can I use low-fat milk instead of whole milk?
Yes, you can use low-fat milk, but the pudding may not be as creamy.
Can I substitute the whipped topping?
You can use homemade whipped cream for a fresher taste, just make sure it’s stabilized so it holds up well.
How do I prevent the pudding from being too runny?
Ensure you follow the instructions for the pudding mix and allow it to set properly in the refrigerator before serving.
Oreo Dirt Pudding
Oreo Dirt Pudding is a delightful dessert that captures the nostalgia of childhood while bringing a sophisticated twist to your table. This no-bake treat layers creamy chocolate pudding, whipped topping, and crushed Oreo cookies, creating a mouthwatering experience that is as visually appealing as it is delicious.
Ingredients
- 1 package (3.9 oz) instant chocolate pudding mix
- 2 cups cold milk
- 1 container (8 oz) whipped topping
- 1 package (15.35 oz) Oreo cookies
- Optional: gummy worms for decoration
Instructions
- In a large mixing bowl, whisk together the instant chocolate pudding mix and cold milk for about 2 minutes, or until it thickens. Set aside.
- In another bowl, gently fold in the whipped topping into the pudding until well combined.
- In a resealable plastic bag, crush the Oreo cookies into fine crumbs.
- In a trifle dish or individual cups, layer half of the pudding mixture, followed by a layer of crushed Oreos, and repeat with the remaining pudding and Oreos.
- Top with additional crushed Oreos and, if desired, add gummy worms for a fun touch.
- Refrigerate for at least one hour before serving to allow the flavors to meld.
Nutrition Information
Yield
8Serving Size
1Amount Per Serving Calories 132Total Fat 2gSaturated Fat 1gTrans Fat 0gUnsaturated Fat 1gCholesterol 5mgSodium 264mgCarbohydrates 25gFiber 1gSugar 18gProtein 2g
TastyFitnessRecipes.com, occasionally offers nutritional information for recipes contained on this site. This information is provided as a courtesy and is an estimate only. This information comes from online calculators. Although tastyfitnessrecipes.com attempts to provide accurate nutritional information, these figures are only estimates.
Final Thoughts
Oreo dirt pudding is not just a dessert; it’s a nostalgic treat that brings joy to any occasion. With its delightful combination of flavors and textures, it’s sure to be a favorite among guests of all ages. Whether you stick to the classic recipe or experiment with variations, this dish is bound to impress. So gather your ingredients, get ready to indulge, and enjoy every delicious spoonful!