This Pear Cobbler combines juicy, ripe pears with a golden, buttery topping that creates a comforting dessert perfect for any occasion. The sweet and slightly tangy flavor of the pears pairs beautifully with the warm, soft biscuit-like crust, making each bite a delightful experience. Whether you’re enjoying it on a cozy autumn evening or serving it at a summer gathering, this cobbler will surely impress your family and friends and become a cherished favorite.
Why You Will Love This Recipe
You’ll love this pear cobbler recipe for its incredible flavor and ease of preparation. The natural sweetness of the pears shines through, complemented by a hint of cinnamon and vanilla, creating a warm, inviting aroma that fills your kitchen. The simplicity of the recipe allows even novice bakers to create a stunning dessert without extensive cooking skills. Plus, it’s a fantastic way to enjoy seasonal pears or to use up any overripe ones, making it a practical choice for busy lifestyles.
Tips and Tricks
To ensure your pear cobbler turns out perfect, here are some tips and tricks:
- Use ripe but firm pears to prevent them from becoming mushy during baking.
- Toss the pears with a little lemon juice to enhance their flavor and prevent browning.
- For added depth of flavor, try adding a pinch of nutmeg or a splash of bourbon to the pear mixture.
- If you’re short on time, consider using store-bought pie crust or biscuit dough for the topping, but homemade is always best!
Common Mistakes to Avoid
Avoid these common pitfalls when making your pear cobbler:
- Overcooking the pears can lead to a mushy texture, so keep an eye on them during the baking process.
- Using unripe pears may result in a less flavorful cobbler, so opt for ripe ones.
- Be mindful not to overcrowd the baking dish; the heat needs to circulate for even cooking.
Make Ahead Tips
You can prep parts of this pear cobbler recipe in advance:
- Peel and slice the pears a day ahead, storing them in an airtight container in the refrigerator to keep them fresh.
- You can also prepare the dry ingredients for the topping in advance and store them in a zip-top bag for quick assembly on the day of baking.
Recipe Variations
Feel free to customize your pear cobbler with these variations:
- Add a handful of fresh cranberries or blueberries for a tart contrast to the sweet pears.
- Experiment with spices; ginger or cardamom can add an exciting twist.
- For coconut lovers, use coconut milk in place of milk in the topping for a tropical flair.
How to Serve
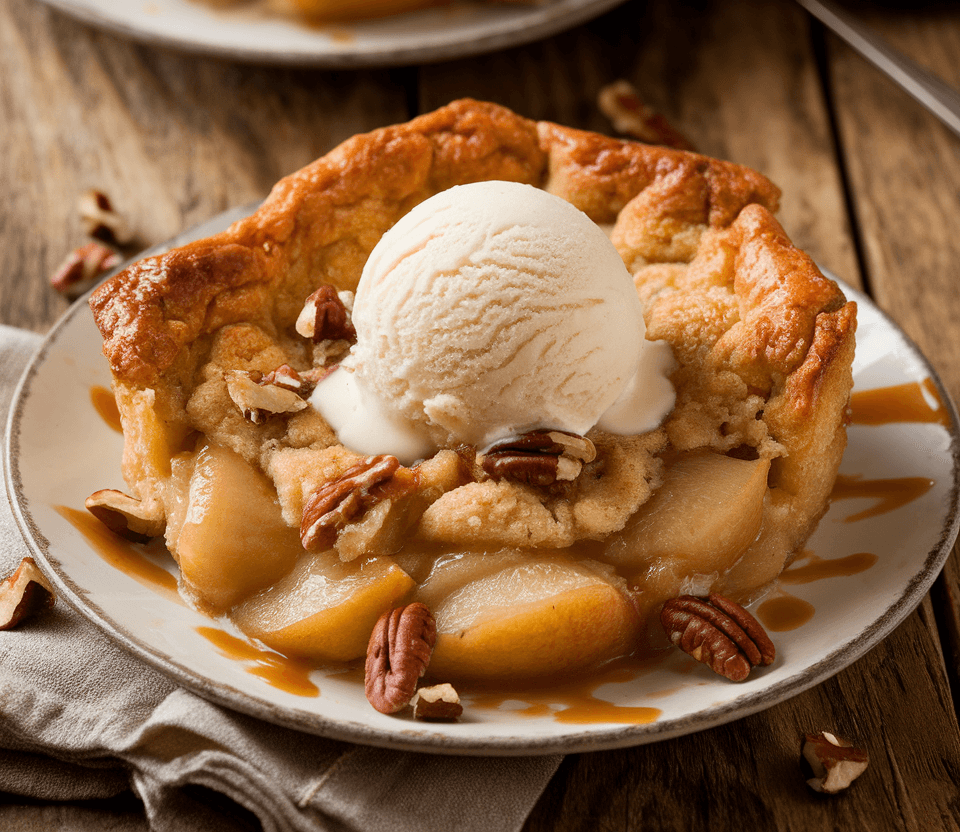
Serve your warm pear cobbler straight from the oven, allowing it to cool slightly for a few minutes. Scoop generous portions into bowls and top with a dollop of whipped cream or a scoop of vanilla ice cream. For an elegant touch, drizzle with caramel sauce and sprinkle with chopped nuts for added crunch.
Pairing Suggestions
To elevate your dessert experience, consider these pairing suggestions:
- A glass of sweet dessert wine, like a late harvest Riesling, pairs wonderfully with the cobbler’s sweetness.
- For a non-alcoholic option, serve with a cup of warm chai tea or spiced apple cider.
- A side of salted caramel brownies can be an indulgent addition to a dessert spread.
How to Store
Leftover pear cobbler can be stored in the refrigerator for up to 3 days. Make sure to cover it tightly with plastic wrap or aluminum foil to maintain freshness. If you’re looking to store it longer, freeze individual portions in airtight containers for up to 3 months. Reheat in the oven at 350°F until warmed through, or microwave for a quick treat.
Equipment Needed
You will need:
- A 9×13-inch baking dish or a cast-iron skillet for an attractive presentation.
- A mixing bowl for combining the ingredients.
- A peeler and knife for preparing the pears.
- Measuring cups and spoons for precise ingredient amounts.
Dietary Adaptations
To make this pear cobbler recipe more inclusive:
- For a vegan version, substitute the butter with coconut oil or vegan butter and use almond or oat milk in the topping.
- To make it gluten-free, use a gluten-free flour blend in the topping and ensure all other ingredients are certified gluten-free.
- For a nut-free option, simply leave out any nuts and ensure your ingredients are free from cross-contamination.
Seasonal Adaptations
In the fall, consider adding seasonal spices like pumpkin spice to enhance the warm flavors of the cobbler. During the summer, you could swap out some of the pears for peaches or plums for a delightful fruit medley.
Cost Breakdown
The estimated cost for this pear cobbler recipe is around $10 for the whole dish, making it about $1.25 per serving. To save money, look for in-season pears, which are often more affordable. You can also use pantry staples for the topping, keeping the overall cost low.
Kitchen Hacks
To make your preparation time faster, consider these kitchen hacks:
- Use a potato peeler for quick peeling of pears.
- Slice the pears evenly by stacking them and cutting through multiple layers at once.
- If you have a food processor, you can use it to mix the dry ingredients for the topping quickly.
Recipe FAQs
Q: Can I substitute the pears with another fruit?
A: Absolutely! Apples, peaches, or berries work great in this recipe.
Q: How long does it take to bake the cobbler?
A: The cobbler typically takes 30-35 minutes to bake until golden brown.
Q: Can I use canned pears instead of fresh?
A: Yes, but be sure to drain them well and reduce the sugar in the recipe, as canned pears can be sweeter.
Pear Cobbler

This Pear Cobbler combines juicy, ripe pears with a golden, buttery topping that creates a comforting dessert perfect for any occasion. The sweet and slightly tangy flavor of the pears pairs beautifully with the warm, soft biscuit-like crust, making each bite a delightful experience.
Ingredients
- 4 medium ripe pears, peeled and sliced
- 1 cup granulated sugar (divided)
- 1 tablespoon lemon juice
- 1 teaspoon ground cinnamon
- 1 cup all-purpose flour
- 1 teaspoon baking powder
- 1/2 teaspoon salt
- 1/2 cup unsalted butter, melted
- 1 cup milk
- 1 teaspoon vanilla extract
Instructions
- Preheat your oven to 350°F (175°C).
- In a large mixing bowl, combine the sliced pears, 1/2 cup of sugar, lemon juice, and cinnamon. Toss until the pears are well coated and set aside.
- In another bowl, mix the flour, baking powder, salt, and the remaining 1/2 cup of sugar.
- Stir in the melted butter, milk, and vanilla extract until just combined.
- Pour the batter into a greased 9×13-inch baking dish or cast-iron skillet.
- Spread the pear mixture evenly over the batter, ensuring the pears are distributed well.
- Bake in the preheated oven for about 30-35 minutes, or until the top is golden brown and a toothpick inserted into the batter comes out clean.
- Remove from the oven and let cool slightly before serving.
Nutrition Information
Yield
8Serving Size
1Amount Per Serving Calories 324Total Fat 12gSaturated Fat 8gTrans Fat 0gUnsaturated Fat 4gCholesterol 33mgSodium 211mgCarbohydrates 53gFiber 3gSugar 35gProtein 3g
TastyFitnessRecipes.com, occasionally offers nutritional information for recipes contained on this site. This information is provided as a courtesy and is an estimate only. This information comes from online calculators. Although tastyfitnessrecipes.com attempts to provide accurate nutritional information, these figures are only estimates.
Final Thoughts
This pear cobbler recipe is not just a dessert; it’s a heartfelt creation that brings warmth and joy to any dining table. It’s easy to make, versatile, and absolutely delicious. Whether it’s a special occasion or a simple weeknight treat, this cobbler is sure to become a staple in your home. So, gather your ingredients, preheat your oven, and dive into the world of baking this delightful dessert! Enjoy the process and, most importantly, enjoy the delicious results!